Saturday, August 18, 2018

Fix iPhone X Blurry Photos


5 Tips to Fix iPhone X Blurry Photos


1. Reset All Settings


2. Set the Focus Manually


3. A Trick You Can Try


4. Restore iPhone with iTunes


5. Change a New iPhone X at Apple Store


Extra Tip: Export Photos from iPhone X to Computer
1. Reset All Settings

In case of iPhone X blurry photos, the first tip we would advise you to try is resetting all your settings in your iPhone X. This will make the settings as the same it was when you bought the phone. Here are the steps to do this.


Go to 'Settings' and select 'General'.


Now, tap on 'Reset' and go to 'Reset All Settings'.


Type in the passcode and select the 'Reset All Settings' option again to confirm.


2. Set the Focus Manually

iPhone ideally sets the camera focus by reading the face automatically. This can give you a trouble if you are taking a picture of other subject than someone's face since your device will not be able to focus the subject properly and will result in iPhone X blurry photos.To avoid this, you simply need to tap on the exact part of the screen where the subject is. You will find a yellow square box which will let you know the focusing portion. Once you tap on the screen, the iPhone will focus at the image properly. This will surely turn your iPhone X blurry photos into normal.
3. A Trick You Can Try

You might be new to this trick and don't know about this at all. Your iPhone X camera needs periodic calibration. For this, you just need to charge it fully and then unplug it, or make the battery charged over 50% . Then leave the device for automatic calibration. Don't use your iPhone X until 4 hours later. We hope this trick comes out well and will fix the problem.
4. Restore iPhone with iTunes

Try to restore your device with the help of iTunes if your iPhone X takes blurry photos. This will, however remove all your data. Hence, making backup prior to going for this method will be a smart move. Let us understand how you can restore iPhone X via iTunes.


Initiate the process with launching iTunes in your PC.


Connect iPhone X with the PC using a lightening cable and enter the main interface.


On the iTunes' main screen, look at the top of the left panel, you will find a device icon.


You need to click on it and then hit on 'Summary' option below the device icon.


Under the 'Summary' tap, you will get the option of 'Restore iPhone'.


Click on it and then confirm the restoring process by again hitting the 'Restore' option on the next pop-up window.Jihosoft Giveaway Alert:


iPhone Backup Extractor - Extract Data from iPhone Backup


The best iPhone Backup Extractor software to extract photos, text messages, contacts, voice memos, note, WhatsApp, Viber and etc from iPhone/iPad backup.


Must Read:Jihosoft iTunes Backup Unlocker


Jihosoft Android Data Recovery: the best Android Data Recovery software for Windows and Mac to recover deleted contacts, messages, photos, videos, WhatsApp and etc from Android devices.

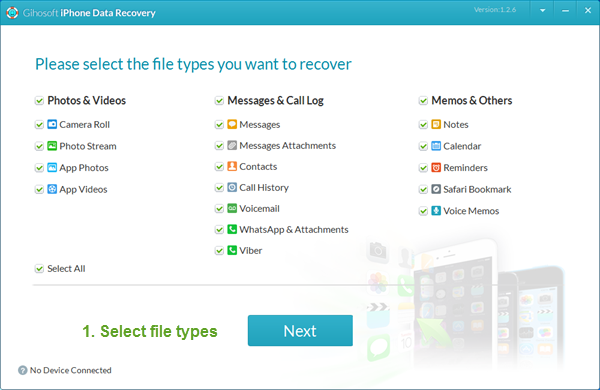
If you can’t sync with iTunes and want to rescue data from a disable iPhone, you could try Gihosoft iPhone Data Recovery. Also feel free to ask questions on the iDevice is disabled error in the comments section below.


This may work and your iPhone X will no more take blurry photos after executing this method.
5. Change a New iPhone X at Apple Store

In case the above solutions went futile and were of no use, we doubt that there is an issue with the device's hardware. In such a situation, we would like to recommend you to search for the nearest Apple Store and talk to the experts there for replacement of your device with the new iPhone X. We advise you to go for this tip as the last resort when you find no resolution to iPhone X blurry photos issue.

Friday, August 10, 2018

How to Turn off Auto-Syncing in iTunes (2019)


How to Turn off Auto-Syncing in iTunes (2019)
Part 1. Turn off Auto-Syncing in iTunes 12 or Later

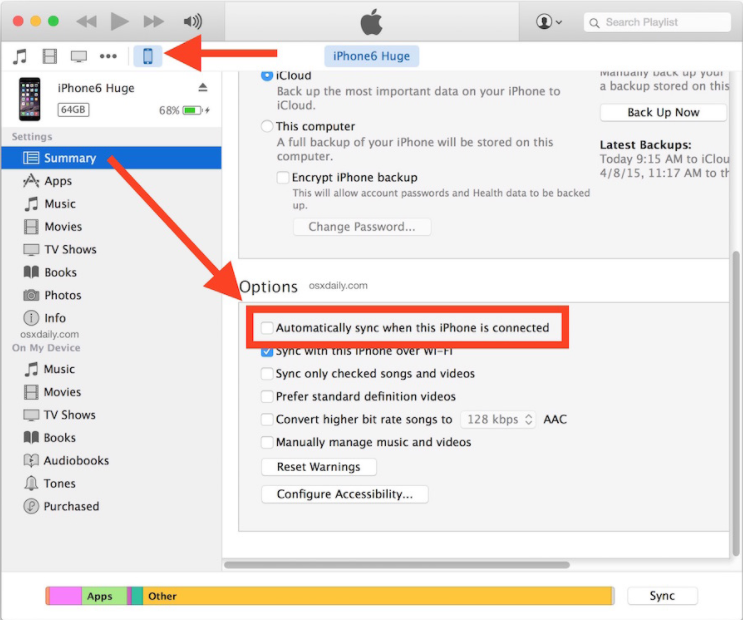
Most iTunes users will have iTunes 12 or a newer version installed. If this is the case, follow these steps:


Connect your iOS device using a USB cable and open iTunes (if it doesn’t launch automatically).


Click the device icon at the top-left of iTunes and then on the “Summary” tab.


Under “Options”, untick the “Automatically sync when this iPhone is connected” box.
itunes-automatically-sync
After disabling this feature, you can connect your iPhone without iTunes automatically syncing.

Part 2. Stop Auto Syncing in iTunes 11 and Earlier

On the other hand, if you have an earlier version of iTunes installed (iTunes 11 and older), you have to use these steps for iTunes to turn off auto sync.
  1. Use a lightning cable to connect your iPhone, and launch iTunes on your Mac.
  2. Go to “Edit > Settings > Devices”, and select the “Devices” tab.
  3. Locate the option “Prevent iPods, iPhones, and iPads from syncing automatically”, and check the box next to it.
itunes prevent from syncing


Neither of these solutions are difficult but there are a lot of minor features like this which make iTunes bothersome to use.
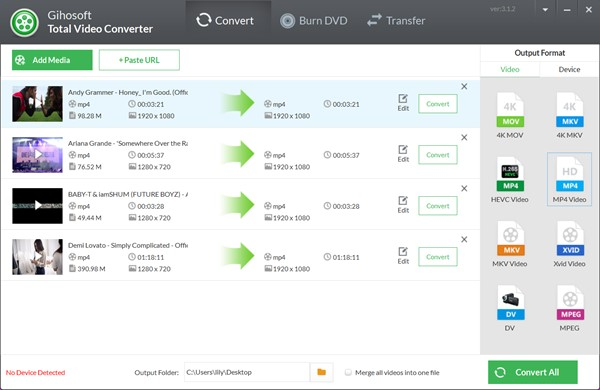
Gihosoft Total Video Converter is a professional all-in-one video tool that enables you to convert videos and audios into various different formats. You can also download videos from YouTube or other online video sharing sites and convert them easily. Plus, you’re able to personalize your videos with its inbuilt editor, such as, trimming, cropping, applying video effects, adding watermark, subtitles, and more. If you need a powerful and professional desktop video converter program, just download Total Video Converter and follow the step-by-step guide here to have a try.
If you lost videos from iOS Camerall Roll which are nowhere to download again, you can use Gihosoft iPhone Data Recovery to get back deleted videos from iOS device including iPhone, iPad and iPod Touch.
Jihosoft Android Data Recovery: the best Android Data Recovery software for Windows and Mac to recover deleted contacts, messages, photos, videos, WhatsApp and etc from Android devices.
Any app suggestions or topic recommendations are appreciated in the comments down below.


Gihosoft Free Android Data Recovery can help you easily recover lost data such as photos, videos, contacts, text messages, WhatsApp & Viber chats from Google Pixel/XL or other Android phones effortlessly.
If you lost videos from iOS Camerall Roll which are nowhere to download again, you can use Gihosoft iPhone Data Recovery to get back deleted videos from iOS device including iPhone, iPad and iPod Touch.
Any app suggestions or topic recommendations are appreciated in the comments down below.

Wednesday, August 8, 2018

Tips to Boost GSM Signal On iPhone to Get Better Reception

How to Boost GSM Signal On iPhone to Get Better Reception 2019 Guide

Experienced bad mobile signal is frustrating enough when you’re out of home. But a bad signal when within your residence? Sigh. So if your calls are cutting out or dropping, it’s time to learn how to boost GSM signal on iPhone.


Some things in smartphone service/signals can’t be changed. For instance, the signal can be distorted by other radio wave signals, but it isn’t feasible to switch off your WiFi router every time you receive a call within your premises. Likewise, it’s not possible to change houses so that you get closer to a network vendor’s tower or into an apartment with good signals.
7 Ways to Boost GSM Signal on iPhone for Better Reception

Fortunately, there are several ways to boost GSM signal on iPhone, so browse through the list and get the bars back on that signal before it drives you nuts. Before you start, we recommend you to enter the field test mode to see the iPhone GSM signal in numerical values.
1. Take Off The iPhone’s Back Cover/Case

While it might sound odd, do yourself a favor and give this step a go. Cases that are bulky can impede reception and muffle sound, mostly when the case is manufactured with metal (or features it). Hence, try removing the case, to see if it solves the issue.


If you see a significant difference after removing the case and there’s and you’re able to boost GSM signal on iPhone, then it’s certain that your case was the cause of weak cell reception. You can replace it with an unproblematic case, or make it a habit of living case-free.
2. Try WiFi Calling

This method enables you to make calls with your home WiFi network. It’s similar to using a VoIP system. If you’re receiving weak signal reception and poor data, the WiFi is a better alternative. Many network carriers provide the ability to switch to WiFi calling on your handset. Get in touch with your carrier for details, as it may cost additional money.

To switch to WiFi calling, go to Settings and tap Phone. You’ll find the WiFi calling feature there. And remember, the step works best when you have a good amount of bandwidth and a strong WiFi signal.
3. Reset Device’s Network Settings

As a basic step, go to Settings and first enable Airplane Mode and then switch it off. Or enable and disable Airplane mode from the Control Center of your device. This should force your mobile device to attempt to reconnect and find a signal, which may solve your problem. Additionally, you can check to see if there are any OS updates available – this could also address problems and bugs that might have been resulting in signal problems.


You can also reset network settings by going to “Settings” – “General” – “Reset” – “Reset Network Settings”, although this could take a while to reconnect.

See Also: How to Boost WiFi Network Signal on iPhone
4. Get a Cell Phone Signal Booster

A signal booster for cell phone is a gadget that takes the signal targeted toward the user’s home and exaggerates it while distortion is cleaned up (when possible), to regenerate it as a strong signal throughout the house. These boosters can be configured in a similar fashion as WiFi routers, but there may be additional parts to install (extracting the internet connection that’s a necessity).


Overall, cell phone signal boosters can turn out to be an excellent buy if your signal experiences dead zones or distortion issues. Users can choose from several different types based on their needs. The con of using these is that they easily cost $100 to $200, so they’re a costly alternative to other options. However, it’s worth paying a visit to your network carrier’s official website to see if any deals are available on certain signal boosters. Get a booster that works with the vendor. Who knows, you might end up saving some money.
5. Try a Signal Finding Map App

There’s a variety of applications on the App Store that can help you discover the strongest WiFi or mobile signals in your locality based on details provided by cellphone vendors or by leveraging crowd-sourced data. While you won’t see an improvement with the touch of a button, these apps will help you locate the best area to get a good chance of decent reception, without requiring you to walk around.


Additionally, it’s worth knowing where the nearest WiFi hotspot is when you’re in a new place and need to use the internet quickly without accumulating data charges.

6. Try Other Carriers

It could be that your carrier doesn’t have the right positions or a tower close enough to provide good reception. If poor signals are nagging you, consider analyzing the towers in your locality to see if any carrier is utilizing a tower that’s near or in a better range (it’s not blocked by skyscrapers, for instance).

If it seems you can get better signals by switching to a new carrier, then do it by all means. Look for carriers, discounts, and deals that will provide cover to your cancellation charges. A lot of savings are available if you search carefully.Gihosoft Total Video Converter is a professional all-in-one video tool that enables you to convert videos and audios into various different formats. You can also download videos from YouTube or other online video sharing sites and convert them easily. Plus, you’re able to personalize your videos with its inbuilt editor, such as, trimming, cropping, applying video effects, adding watermark, subtitles, and more. If you need a powerful and professional desktop video converter program, just download Total Video Converter and follow the step-by-step guide here to have a try.

Poor network may lead to some problems on your iPhone, for instance, contacts duplicating in a sudden. To efficiently manage your contacts and free some space, it is necessary to delete multiple contacts on your iPhone regularly. If you accidentally lost contacts but have no backup, you can use Gihosoft iPhone Data Recovery to retrieve contacts without any backup. This software is a professional and powerful tool for any iOS device user to easily get back their deleted data like messages and photos from iPhone or iPad, with its efficient engine and easy-to-use interface.

Sunday, August 5, 2018

jelbrekTime jailbreak released for watchOS 4.0-4.1 2019 Guide


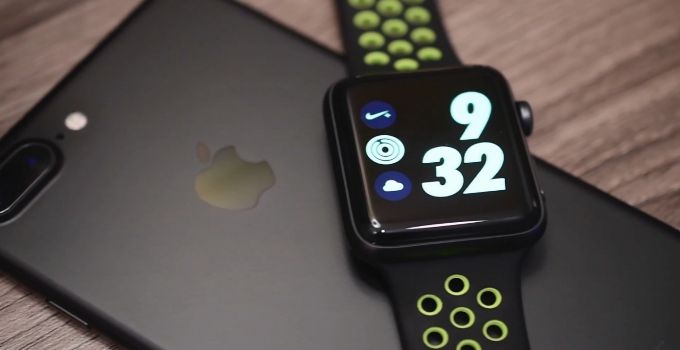
Tihmstar has done the impossible by developing an Apple Watch jailbreak for watchOS 4.1. Here’s how this jailbreak works and how you can use it on your Apple Watch.


Table of Contents


What’s jelbrekTime?


Which Apple Watch models are compatible with jelbrekTime?


watchOS 3.0-3.2.3


watchOS 4.0-4.1


watchOS 4.2-4.3.2


Installation


Future development and support


WHAT’S JELBREKTIME?


jelbrekTime is v0rtex-based watchOS 4.0-4.1 firmware jailbreak for Apple Watch series 3. It is developed by the eminent German security researcher Tihmstar.


It’s quite rightly the first jailbreak to be ever developed for the Apple Watch. Although Ben Sparkes was the first developer to develop a watchOS jailbreak, he never released a fully functional app.


With that being said, jelbrekTime can’t run Substrate-based jailbreak tweaks as of yet. However, that could change in the future provided a developer ports Comex’s Substitute successfully to watchOS.


Here’s a quick rundown of jailbrekTime’s features –


Exploits kernel using v0rtex


Remounts root filesystem as read/write


Root access (tfp0 patch)


Extracts bootstrap.tar package


h3lix kernel patches


Important – Remember, this is not a user-facing jailbreak. Please DO NOT install and jailbreak your Apple Watch unless you know what you’re doing.
WHICH APPLE WATCH MODELS ARE COMPATIBLE WITH JELBREKTIME?
WATCHOS 3.0-3.2.3


watchOS 3 is incompatible. However, you can modify the project by implementing v0rtex exploit and adding kernel patches manually.
WATCHOS 4.0-4.1


jelbrekTime only supports Apple Watch series 3 on watchOS 4.1 out-of-the-box.


If you own a different model, you must add more offsets to offsetfinder.c. You can access offsets for your particular model using the offset finder utility.
WATCHOS 4.2-4.3.2


Since jelbrekTime utilizes v0rtex exploit, any version above watchOS 4.1 is incompatible. Apple patched v0rtex exploit in watchOS 4.2, thus rendering it useless for 4.2 and newer versions.
INSTALLATION


Clone git repo.


Open in XCode > select certificate for the main app, watch app, and watch extension.


Build and run the iOS app on Phone.


Open the stock Settings app, go to General > Profiles & Device Managementtrust your certificate.


Run the iOS app on our iPhone via XCode again.


Open jailbreak.m and set a breakpoint.


Build and run Watchkit App on your Apple Watch.


Launch the app again on your watch and accept the trust certificate therein.


Run the Watchkit app via XCode and wait for it to install.


Tap the jelbrekTime button in Watchkit App and wait Wait for the breakpoint to hit in XCode.


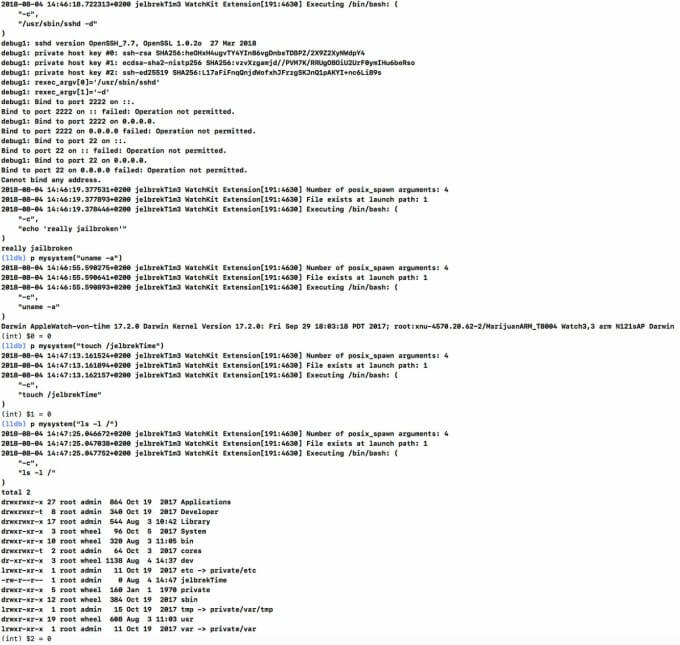
You can now execute terminal commands by entering the following commands one after the other –


p mysystem(“ls /”)


p mysystem(“id”)


p mysystem(“ps aux”)


FUTURE DEVELOPMENT AND SUPPORT


Although the developer hates watchOS development, he intends to release a new version somewhere down the line. The new version will include the following features –


BYOB (Bring Your Own Bootstrap)


BYOO (Bring Your Own Offsets for non-watchOS 4.1 users)


BYOS (Bring Your Own Shell)


You can expect some great stuff coming out for the Apple Watch ecosystem as it becomes more mature and enough developers jump on the watchOS bandwagon. iOS-style modifications like custom watch faces, new user interface, and other features could become possible in the future.

Check out our Facebook and Twitter pages for more jailbreak news and updates.

If you lost videos from iOS Camerall Roll which are nowhere to download again, you can use Gihosoft iPhone Data Recovery to get back deleted videos from iOS device including iPhone, iPad and iPod Touch.

Jihosoft iPhone Backup Extractor Extract and recover all types of data from iPhone backup files, such as camera roll photos, videos, SMS, contacts, reminders, WhatsApp, and etc.

Jihosoft Android Data Recovery: the best Android Data Recovery software for Windows and Mac to recover deleted contacts, messages, photos, videos, WhatsApp and etc from Android devices.

Any app suggestions or topic recommendations are appreciated in the comments down below.


Monday, July 23, 2018

How to Fix iOS 12 Beta or Public wifi problem ?


How to Fix iOS 12 Beta or Public wifi problem ?
I have seen lots of iPhone, iPad users are reporting this bug, and I hope after reading this post their issue gets solved. iOS 12 will be released soon and if your iPhone faces difficulty in connecting the Wi-Fi then follow the listed measures. So I would also suggest you to follow this article and try to get rid of iPhone Wi-Fi dropping issue.


Troubleshoot WiFi issues and Solutions in iOS 12 Beta or Public


Problem 1: iPhone/iPad not connecting to Wi-Fi


Personal Hotspot Not Working: Check this if WiFi is dropping On Mac or PC, while you connect your iPhone’s personal hotspot to Mac or Windows. Laptop or Mac won’t connect to iPhone’s Personal Hotspot.


Most of the people have updated their iPhone, iPad to iOS 12 or iOS 11. Some of them are enjoying its latest features, and few are dealing with the latest bugs. One of the most stated bugs is iPhone & iPad not connecting to Wi-Fi. So, check the below steps and try to solve this.
Fix 1: Examine your Router


Before going in in-depth, let’s begin with basic. Connect other devices to the same router, and if they are simple gets connected to that router, then the issue is with iPhone and showing error then replace or repair the router.
Fix 2: Verify that Wi-Fi enabled on iPhone


Check Wi-Fi is enabled or not,


Step 1: Go to “Settings” and click on Wi-Fi.


If you are connected to any network, then it will display as Connected under that network.
Fix 3: Enter password if required You may also like:online youtube downloader


If you did not set any password for Wi-Fi network then just open Wi-Fi “Settings” and tap on that network to connect. Or else when you tap on that network you have to enter correct password or else it will show error like iPhone can’t connect to this network or Wrong password.
Fix 4: Check all the cables connected to router or modem


Check both RJ-45 pin/Ethernet pin and its cable. If you find any defect in them, contact customer service. Alongside, check that your router is connected to modem or not. Even this isn’t work then go to next step.
Fix 5: Restart iPhone iPad and router and modem


Restarting all the devices will fix all the small bugs and errors.You may also like:recover deleted photos from computer


How to restart iPhone/iPad


Step 1: Press and hold both the power button and home button until you see the apple logo on the screen on iPhone 7/7 Plus or earlier. Check Model wise iPhone X, iPhone 8/8 Plus Restart iPhone


How to Restart Router and Modem


Unplug all the cables which are connected to them for around 15 minutes and connect back again.


Now check again that it is working or not. If not then try next step.
Fix 6: Reset Network Settings


Resetting Network Settings will clean up all your Wi-Fi passwords and cellular Settings along with VPN/APN settings.


Step 1: Go to “Settings” and open “General”.


Step 2: Next, click on “Reset” and then “Reset Network Settings”.


Now turn on the Wi-Fi on iPhone iPad and connect it to the network.
Problem 2: Wi-Fi won’t turn on


Some of the iPhone users had recently reported that Wi-Fi won’t turn on after updating the iPhone to iOS 12.And if you belong to those who are stuck in this issue the look below troubleshoots.
Fix 1: Update the iPhone


Go to Settings and check if any new update is available for your iPhone and if it is then updated it as soon as possible. It can fix the bug if it is software related.


Step 1: Launch “Settings” and open “General”.


Step 2: Scroll down and tap on “Software Update”.
Fix 2: Reset Network Settings


If in the case above fix doesn’t work for you then try to reset the network Settings of your iPhone iPad.


It will clean up all of your Wi-Fi passwords, VPN and APN settings.


Step 1: Go to “Settings” and open “General”.


Step 2: Tap on “Reset”.


Step 3: Now finally hit the “Reset Network Settings”.
Fix 3: Hard Restart iPhone


After trying both the above fixes still the problem isn’t solved then shut down the iPhone for few minutes.


Press and hold the side key and home button at the same time until apple logo arrives on the screen on iPhone 7/7 Plus and Earlier, For iPhone X/8/8+ Get how to restart or Hard Reboot.
Fix 4: Restore the iPhone to its factory settings


It is tough for anyone to wipe out all the data on iPhone. But still, none of the above measures worked you have to do this. Take backup to save your data. iTunes and iCloud are two alternatives for backup your iPhone. However, you cannot use iCloud as Wi-Fi won’t show up so go for iTunes. After backup follows the steps.


Step 1: Go to “Settings” and tap on “General”.


Step 2: Next, click on “Reset” and then on “Erase all Contents and Settings”.
Fix 5: Reset Router


If iPhone iPad still continues to show error like disconnecting randomly or Wi-Fi won’t show. Then Reset the router by unplugging the cable for at least 10 minutes and then connect the cable.
Problem 3: iPhone keeps dropping Wi-Fi


iPhone keeps dropping Wi-Fi then you must make sure that iPhone is in the range of Wi-Fi router. If it is in range and still you are stuck with the same then try this tips to fix dropping issues.
Fix 1: Diagnose the Wi-Fi router


Diagnose means try to connect other devices to the same network and still it is showing the same error then contact the service provider.
Fix 2: Renew Lease


On your iPhone or iPad,


Step 1: Go to “Settings” and open “Wi-Fi”.


Step 2: Now click on info icon on your Wi-Fi network.


Step 3: On the DHCP screen at the bottom click on the “Renew Lease”.
Fix 3: Forgot the network


When you click on Forgot the Network it will remove all the data related to that Wi-Fi network including the Wi-Fi password.


Step 1: In the “Settings” click on Wi-Fi.


Step 2: Then on your network tap on info icon.


Step 3: Now tap on “Forgot this Network”.
Fix 4: Reset Network Settings


If you are stuck in any type of network related issues then resetting network Settings will be prior option to fix the bug.


Step 1: Open “Settings” and then click on “General”.


Step 2: Then Click on “Reset” and after that on “Reset Network Settings”.


If you lost videos from iOS Camerall Roll which are nowhere to download again, you can use Gihosoft iPhone Data Recovery to get back deleted videos from iOS device including iPhone, iPad and iPod Touch.

Jihosoft iPhone Backup Extractor Extract and recover all types of data from iPhone backup files, such as camera roll photos, videos, SMS, contacts, reminders, WhatsApp, and etc.

Saturday, July 21, 2018

How to Disable Instagram Activity Status on iPhone and Android


How to turn off the status indicator Instagram online iPhone and Android

Step # 1. Open Instagram on your device.

Step # 2. Now press the profile tab in the bottom right corner of the screen.

Step # 3. Next, on your iOS device, you must press the gear icon.


On your Android device, you need to tap the three vertical dots at the top right corner of the screen.

Step # 4. Then press Activity Status .


Step # 5. Finally, Disable the switch next to Show Activity Status


That's About It!

Go ahead, no one can see when you go online. In addition, you will not be able to see the status of other activities either.Jihosoft iPhone Backup Extractor Extract and recover all types of data from iPhone backup files, such as camera roll photos, videos, SMS, contacts, reminders, WhatsApp, and etc.

Gihosoft Free iPhone Data Recovery is a professional iPhone Data Recovery software to get back all your lost text message, photo, video, call history, note, contact and more from iPhone/iPad/iPod Touch.


What is your opinion?

What is your opinion on this update? Will you keep it on or off? Feel free to draw your thoughts in the comments below.


How to fix Can’t Update iTunes on Windows 10


How to fix Can’t Update iTunes on Windows 10


Can’t Update iTunes on Windows 10
How to fix Can’t Update iTunes on Windows 10
Find and Install the Latest Update for Apple Software Update


Downloading and installing the latest version of Apple Software Update on your Windows machine can help to solve the problem of “can’t update iTunes on Windows 10”.Sponsor ads:Share YouTube Video at Specific Time from App and Browser


Here are the steps to update Apple Software Update app on Windows 10:
Also Read:8 Best To-do List Apps for Your iOS Device to Make Your Work Done
Also Read:Windows 10 Blue Light Filter: Learn Something about Your Eyes Saver
Also Read:Top 5 Best Free File Recovery Software 2019 for Windows and Mac
18 Best Indian Web Series on YouTube You Can’t Miss 2019

Also Read:3 Ways to Use WhatsApp without a Phone Number or SIM in 2019
Step 1: Navigate to Start menu and tap “All Programs Apple Software Update”.


Step 2: From the list of available updates, check only Apple Software Update, click “Install” to start downloading and installing the newest version of Apple Software Update.


Step 3: Open Apple Software Update again and it will search for updates automatically. Now, check only iTunes and click “Install” to download and install the latest version of iTunes.
Tip #3. Uninstall and Manually Download iTunes


Still can’t update iTunes on Windows 10 after trying the second tip or you don’t want to follow that method? You can use iMyFone TunesFix to uninstall iTunes and its related software components completely and download the latest version on your PC.


Step 1: Launch TunesFix and go to the home interface.


Step 2: Choose “Full Uninstall > Uninstall” to remove iTunes and its related software components.


Step 3: Tap “Click here” to reinstall iTunes.Jihosoft iPhone Backup Extractor Extract and recover all types of data from iPhone backup files, such as camera roll photos, videos, SMS, contacts, reminders, WhatsApp, and etc.


Gihosoft Free iPhone Data Recovery is a professional iPhone Data Recovery software to get back all your lost text message, photo, video, call history, note, contact and more from iPhone/iPad/iPod Touch.


Tip #4. Repair iTunes via Windows Control Panel


Repairing iTunes from the control panel can help to fix the issue that’s causing can’t update iTunes on Windows 10.


Step 1: Launch “Uninstall a Program” from your Windows Control Panel.


Step 2: Select iTunes as the program you want to uninstall. Click “Repair” and follow the prompts to complete the repair process.


Step 3: Uninstall iTunes and reinstall iTunes on your Windows 10 PC again.
Tip #5. Update Windows


Still can’t update iTunes on Windows 10? Then try updating your Windows 10 to its latest version.


Step 1: Click the Start menu, then go to “Settings > Update & Security > Windows Update > Check for updates”. Ensure you are connected to a Wi-Fi network.


Step 2: If Windows says your device is up to date, then it means that all your devices are currently up to date. If not, it will automatically update your PC.


Step 3: Windows will give you a notification to restart your PC at the end.

Is the New LG Z3 8K OLED TV the Best TV Money Can Buy?

  Is the New LG Z3 8K OLED TV the Best TV Money Can Buy? The LG Z3 8K OLED TV is certainly a high-end television with impressive features an...